Web 4 Final Project Starter Files (2025)
IMPORTANT NOTE: I recently discovered that the newest version of XAMPP will not allow you to run DROP DATABASE statements. A few of the SQL scripts that we run in this video have DROP DATABASE statements in them. In order to allow them, you'll need to make a configuration change to the MySQL server. These are the steps to follow:
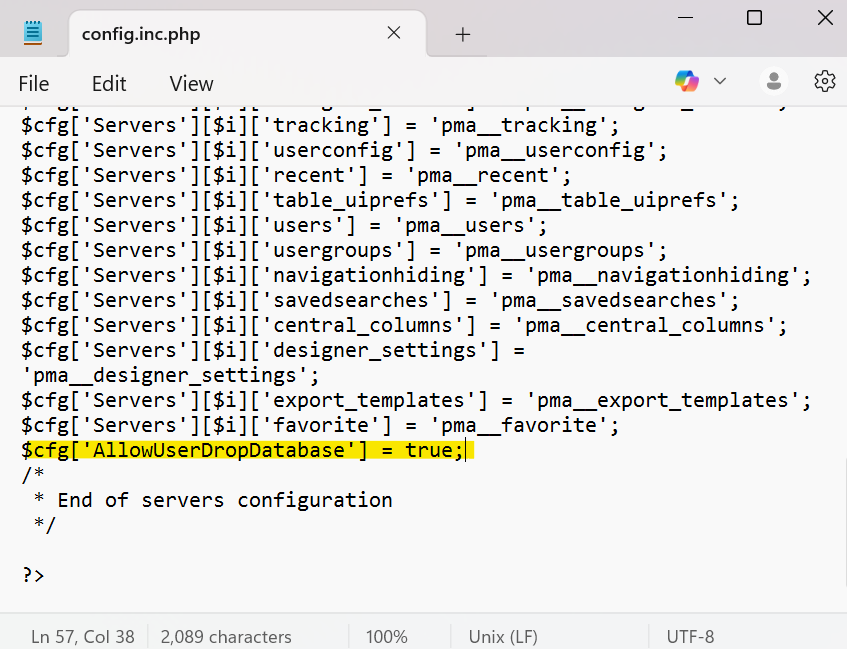
- Open this file in NotePad: C:\xampp\phpMyAdmin\config.inc.php
- Look for this setting in the file (it may not be there): $cfg['AllowUserDropDatabase'] = false;
- If you find it, change its value to true (but make sure not to delete the semi-colon at the end of the line).
- If you don't find it, you'll have to add it NEAR the end of the file, put it just before the comment that says 'End of servers configuration' (see the screen shot below)
- Save the file
- Stop and then start both the Apache server and the MySQL server (in the XAMPP Control Panel)
STEP 1 - Starter Files
Log into your MySQL server and run the script in the database.sql file (which is in the dev-notes folder). This script will create two databases, and populate them with the initial tables that you'll be using for the project.
Install the NPM modules
npm install
Install Nodemon (globally) if you don't already have it installed:
npm install nodemon -g
Look in the package.json file
- Notice the dependencies
- Notice the scripts (and that they are using dotenv)
- dev starts the app for your development environment
- test starts the Jest unit tests
- start starts the app on the live/production server
- Note that we declared setup and teardown scripts for Jest (we'll talk about these in a minute)
- globalSetup
- globalTeardown
Note that server.js imports the app (from app.js) and starts the server. The server.js module uses the dotenv module to load variables from the .env files.
We have 3 different .env files for each of the environments that our app will run in.
- .env.dev - for when we are doing development
- .env.test - for when we run the tests
- .env - for when the app runs in the live environment
Go back into the package.json file and note how the scripts use the dotenv-cli module to specify which .env file to use
Note that db.js configures the database connection (using ENV variables) and that it exports a connection pool.
Note that utils.js is a module/component that we can add utility functions to, it currently has just one function that can be used to validate email addresses.
Run the app:
npm run dev
Open your browser and to to localhost:8888, and you should see a 'Hello World' message.
Go to the route for the homepage (in app.js) and remove the comments around the try/catch block. This code will execute a SQL query and log the results.
Refresh the page in your browser and check the log on the server to make sure the query ran successfully.
If the query ran successfully, then delete (or comment out) the try/catch block.
Run the tests:
npm run test
Hopefully they are all passing.
Note that when you run the tests, the setup-test-database.js script will use the setup-test-database.sql file to drop all tables and recreate them in the project_x_test database. This script will run each time you run the tests because of the jest globalSetup configuration in the package.json file.
Likewise, when all of the tests complete, the teardown.js will close the connection pool.
Look in utils.test.js and make sure you understand the test code.
Look in api.test.js and note that it is using the supertest NPM module. This module allows you to make API (ajax) calls to verify that you app is returning the proper responses. It does by starting the app (which you pass in as a param to the agent() method) and returning an 'agent' object which you can use to make requests.
Note how the test are using the agent, for example:
const response = await agent.get("/");
In this code, we use the agent to make a GET request to the home page. The agent returns a response object that represents the response from the server. We can then check the data inside the response object to verify that our routes are working properly and returning the proper response.
Try to understand the files that are in the project right now. It may take a while to make sense of all of them now, but you'll need to understand the purpose of each one by the time you take over the project. And we'll be adding many more files as we move through the project.
Don't be afraid to ask questions in class!